Create or modify an auto attendant
An auto attendant is used to route calls to various destinations, employees within your company, specific groups of employees, voicemail, or other outside numbers. It provides callers with your company greeting and dialing menu options.
The auto attendant has two primary modes, one for business hours and the other for after hours. In addition to the primary modes, an administrator can create a holiday schedule for special closures and/or holidays. Each mode allows administrators to set up options 1 – 9, #, and * to present callers with different options from which to select.
Create an auto attendant
You can use an existing business hours and holiday schedule to configure the time/days your auto attendant is operational and non-operational, or create a new schedule when you create an auto attendant. To configure your business hours and holiday schedules in advance of creating an auto attendant, see this guide for more information.
- Log in to User Hub.
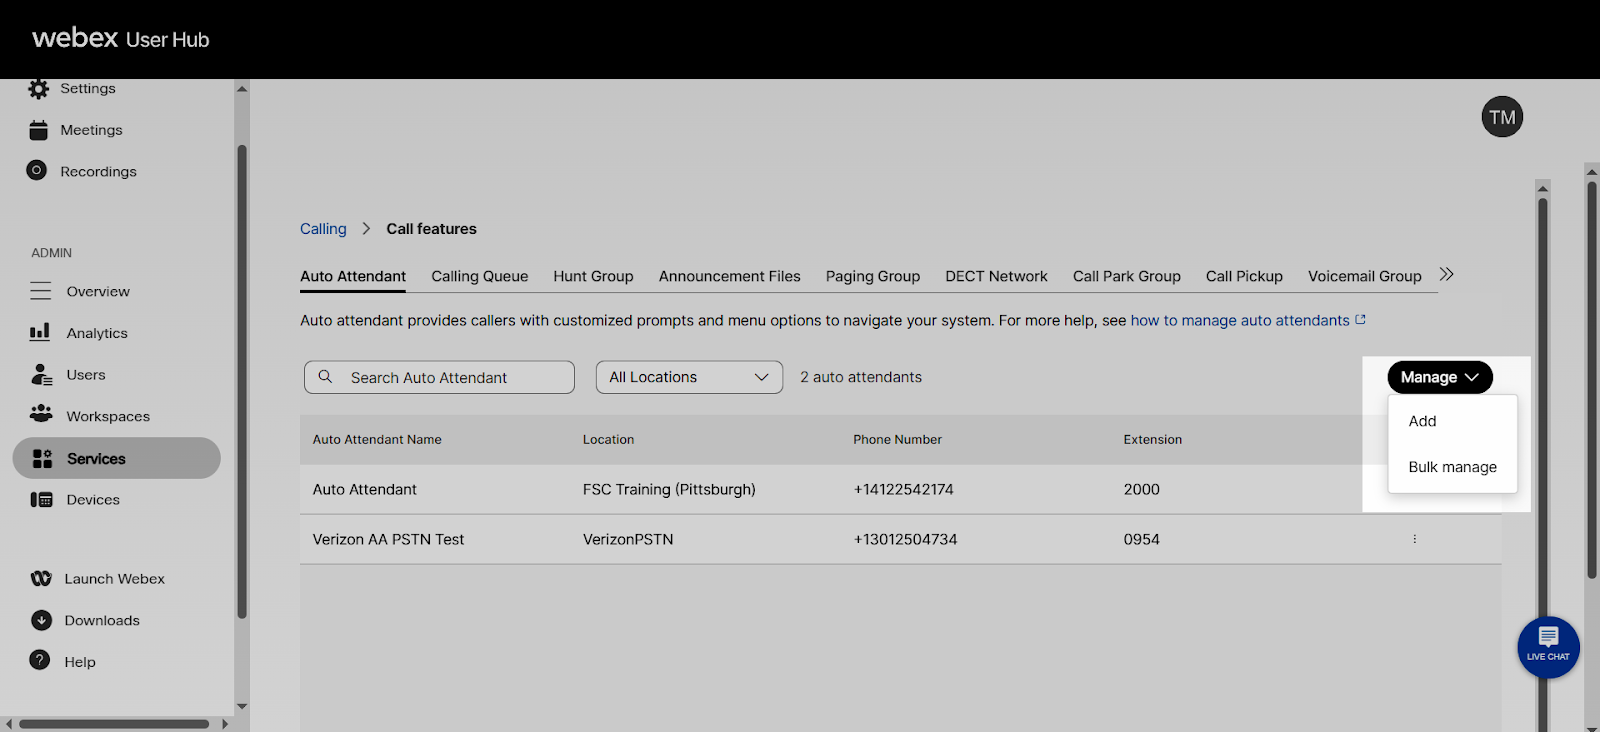
- Under Admin, in the left menu, select Services.
- Select Call features and then Auto Attendant.
- Select Manage > Add.
- On the Basics screen, enter the following information:
- Location - Where you would like to assign this auto attendant.
- Auto Attendant Name - This is used to identify the auto attendant later on.
- Phone Number and/or Extension
- Language - Used for audio announcements for this hunt group.
- Caller ID - The caller ID is used for calls that are forwarded outside of the auto attendant.
- Select Next.
- On the Business Schedule screen, select the business hours schedule to assign this auto attendant. Or, you can Create a new schedule.
- Select Next.
- On the Holiday Schedule page, select the holiday schedule to assign this auto attendant. Or, you can Create a new schedule.
- Select Next.
- On the Menu screen, determine the dialing menu options on both the Business Hours and After Hours tabs. Use the drop-down menu to assign each keypad number a function. Options include:
- Not used - This is the default when an action has not been selected for that digit or character.
- Play announcement - Use this functionality to select, upload, or record an announcement at the location or at the organization level and play the same.
- Transfer call with prompt - This action routes callers to a phone number that is not a user or extension within the company. For example: A third-party answering service or corporate call center. With this option, callers will hear a prompt telling them that they are being transferred.
- Transfer call without prompt - This action routes callers to a phone number that is not a user or extension within the company. For example: A third-party answering service or corporate call center. With this option, callers will not hear a prompt telling them that they are being transferred.
- Transfer call to operator - This action redirects callers who do not choose an option from the auto attendant dialing menu (or “time out”) to a configured operator. If you chose to enable this action, enter the phone number to which to route callers. Note: This action must be assigned to a key before the “time out” function is supported. When enabled, the caller will be transferred to the configured number when the key assigned is pressed or if no keys are hit after 10 sections, which is the “time out” period.
- Transfer call to voicemail - This selection places callers directly into the voicemail box of the phone number or extension entered.
- Dial by name - This action permits callers to dial by recipient name, using the letters on the keypad.
- Dial by extension - This action lets callers dial by recipient extension, using the numbers on the keypad.
- Repeat menu - If selected, this action will repeat the greeting and menu options.
- Exit menu - This action allows callers to exit the menu system. This will terminate the call.
- To allow callers to dial an extension without a menu prompt, check the box next to Enable extension dialing without requiring a menu item.
- Select Next.
The following will happen when zero (0) is, or is not, set up when a caller calls into the auto attendant:
- If zero (0) is set up and the caller dials zero (0), the action is performed as assigned.
- If zero (0) is not set up and the caller dials zero (0), nothing happens and the call is disconnected.
- If zero (0) is set up and the caller does nothing, after several seconds, the following message is played: “Your call cannot be transferred. Please try again later.”
- If zero (0) is not set up and the caller does nothing, the call is simply disconnected.
- On the Greeting page, select the greetings (announcements) that will be placed for both Business Hours and After Hours. You can choose to play the default greeting, upload an audio recording, or record your own greeting. Once your selections are made, select Next.
- Review and select Create to save.
- When complete, select Done.
Modify an auto attendant
- Log in to User Hub.
- Under Admin, in the left menu, select Services.
- Select Call features and then Auto Attendant.
- Select the auto attendant you’d like to modify.
- To enable or disable, select the toggle.
- Select General Settings to modify the assigned Language, Time Zone, or Caller ID. This is used when call forwarding is enabled and calls are forwarded out of this auto attendant.
- Select Phone Numbers to modify the assigned phone number and/or extension.
- To assign alternate numbers, select the phone numbers you’d like to add. The alternate numbers feature allows you to assign up to 10 phone numbers or extensions to an auto attendant. Each number will reach the same greeting and each menu will function identically to the main number.
- Select Call Forwarding to modify the call forwarding settings. To enable, select the toggle. Then choose one of the following options:
- Always Forward Calls will forward all calls to the designated number you enter here.
- Selectively Forward Calls will forward calls to a designated number based on the criteria you determine. If you choose this option, you will need to have at least one rule for forwarding applied and active.
- Select Add When to Forward or Add When Not to Forward to create a rule. Enter the Rule Name.
- Select a Business Schedule and Holiday Schedule.
- For Forward To, select either Default Phone Number or add a Different Phone Number.
- For Calls From, select Any Number or Selected Numbers with at least one option from the following:
- Any Number - Forwards all calls in the specified rule.
- Any Private Numbers - Forwards calls from private numbers.
- Any Unavailable Numbers - Forwards calls from unavailable numbers.
- Add Specific Numbers - Forwards calls from up to 12 numbers that you define.
- For Calls To, select a number or alternative number front the drop-down list, so that calls are forwarded when a call is received to this number. Select Save to save your changes.
Once a rule is created, you can enable, disable, edit, or delete the rule from the table.
- Under Business Hours Auto Attendant, you can modify the following:
- Schedule - Update the schedule for when the business hours settings are applied to this auto attendant.
- Menu - Update the dialing menu actions to apply during the business hours for this auto attendant.
- Greeting - Update the greeting played during the business hours time schedule selected. The default greeting option plays a default greeting for incoming calls. The custom greeting option allows you to upload an audio file or record a greeting using the recording function.
For custom greeting, the audio (WAV) file must meet the following requirements:
- 8 or 16 khz
- 8 or 16 bit mono
- u-law, A-law, or PCM
- Maximum file size of 2MB (or approximately 4 minutes of playback)
You can find more information for recording from your phone and sample greeting scripts by clicking Instructions for recording on a phone and Show me a sample script.
- Under After Hours Auto Attendant, you can modify the following:
- Menu - Update the dialing menu actions to apply during after hours for this auto attendant.
- Greeting - Update the greeting played during the after hours time schedule selected. The default greeting option plays a default greeting for incoming calls. The custom greeting option allows you to upload an audio file or record a greeting using the recording function.
For custom greeting, the audio (WAV) file must meet the following requirements:
- 8 or 16 khz
- 8 or 16 bit mono
- u-law, A-law, or PCM
- Maximum file size of 2MB (or approximately 4 minutes of playback)
You can find more information for recording from your phone and sample greeting scripts by clicking Instructions for recording on a phone and Show me a sample script.
- Under Holiday Auto Attendant, you can modify the following:
- Schedule - Update the schedule for when the holiday settings are applied to this auto attendant.
The menu and greetings that have been set for After Hours are applied to the Holiday Schedule.
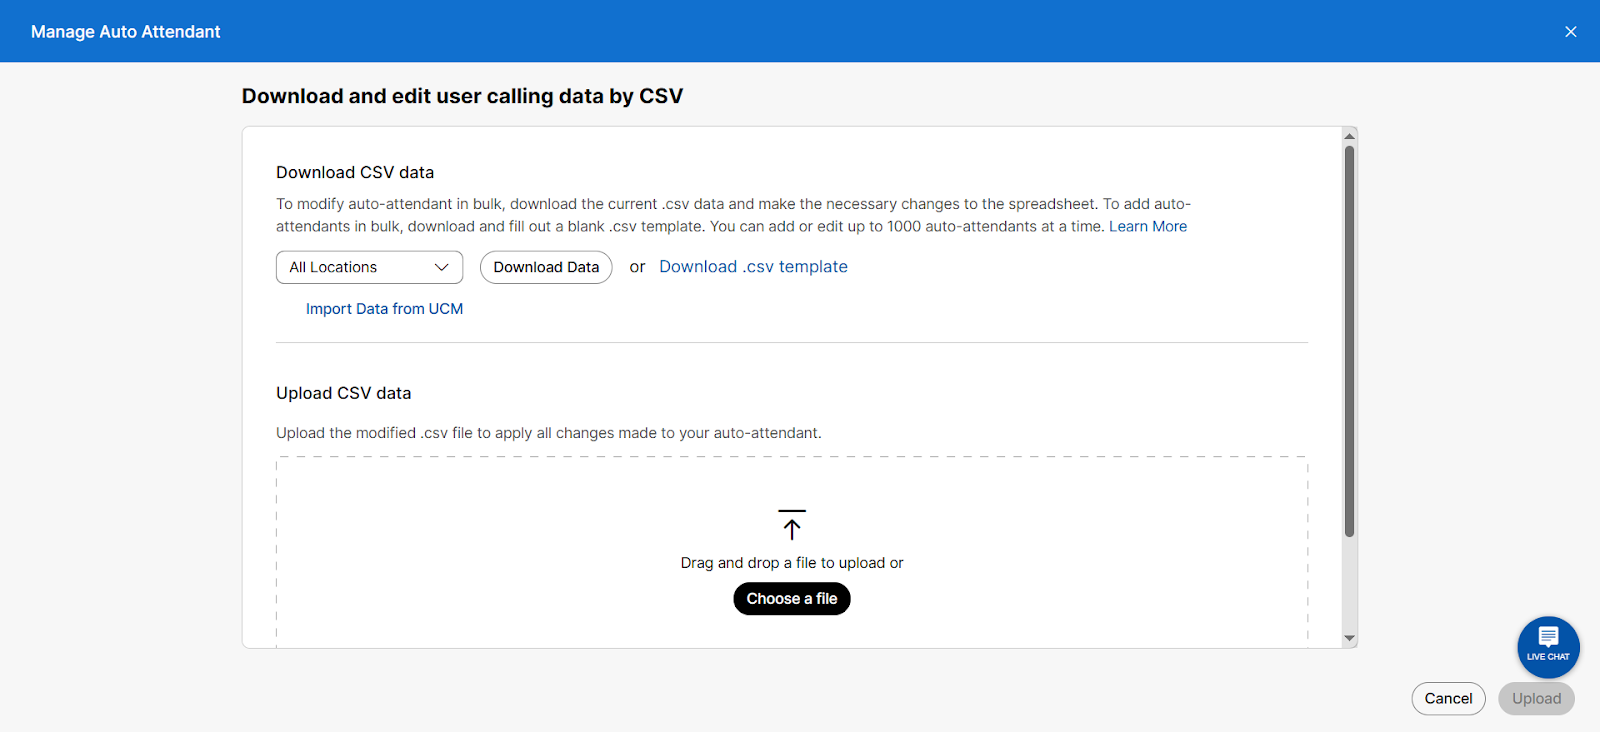
Modify Auto Attendants in Bulk
If you need to modify multiple auto attendants, you can bulk edit them. Expand the Manage dropdown and click Bulk Manage.
To modify auto-attendants in bulk, download the current .csv data and make the necessary changes to the spreadsheet. To add auto-attendants in bulk, download and fill out a blank .csv template. You can add or edit up to 1000 auto-attendants at a time.
When finished, click Upload. Follow the import task status to view how many attendants were added and updated, or if the file upload rendered any errors.